Let It Grow
By Tammy Thornton
Now that warmer weather has taken hold, our gardens are blooming their little hearts out. We’ve reached that sweet spot of warm days and cool nights. Sun-loving flowers are happily blooming, even those that don’t like extreme heat. Some of the plants in the latter group will go mostly dormant once the summer sun beats down on them. But for now, our flowers are living their best lives. How fitting that our gardens are full of blooms just as we also hit the peak of weddings, proms, and other events that call for flowers and centerpieces. Arranged flowers from the florist can be quite pricey. However, in a few easy steps, you can make your own centerpieces and arrangements from the garden, adding a personal touch and saving you money.
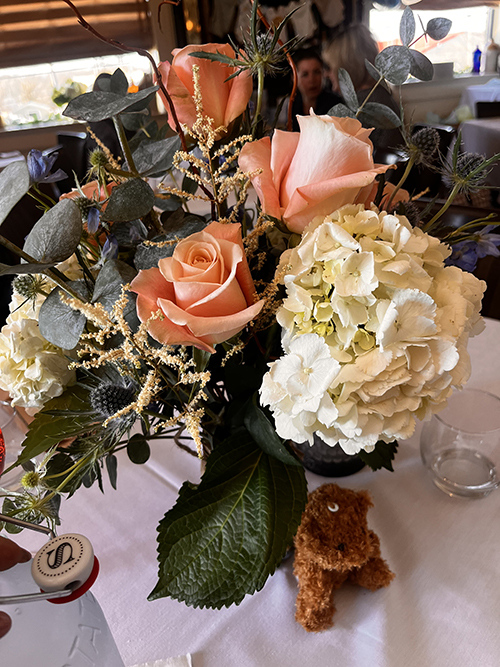
Dried flowers, eucalyptus, and sea holly serve as “fillers” for this baby shower centerpiece, complete with a sweet little Teddy bear.
When it comes to cut flowers, hydration and timing are everything. Once you cut flowers, the clock starts ticking, and if you don’t give them a proper water source, most plants will begin to wilt. It’s a good idea to do a practice run days or weeks before your event to see how many days your cut flowers will remain looking fresh. Greenery can often fare a little better than the flowers themselves.
Of course, the easiest way to keep flowers fresh would be to use a vase or container that can hold water. You can cleverly hide a vase inside a larger container that fits your theme. But other times, your centerpiece requires the use of Oasis. This type of foam block can be soaked in water to help keep the stems of your flowers hydrated. Before cutting the flowers you want to use, water them well so that they start out happy and refreshed. Cut your stems at an angle and immediately plunge them into water to absorb as much as possible right away. You will want to have a bowl, pot, or other container to hold the Oasis so that you don’t have a soggy green mess on your hands. Recently, I found green, flat containers that came with the Oasis pre-glued in the bottom. Since I was using mainly flower heads with hardly any stem, these shallow receptacles worked perfectly for my purposes. Before I started inserting flowers into the Oasis, I filled the containers with water. I gave them a few minutes, and the water was quickly absorbed into the Oasis. Then, I needed to add more water several times. So, when using Oasis in containers, make sure they are completely saturated. Also, I’m all about reusing and saving money, but once you use Oasis, it won’t work as well the next time. Holes created from the first use will keep your Oasis from being as effective. It can also retain bacteria from previous uses.
You may have heard the rule of thumb “thriller, filler, spiller” when it comes to planting pots and urns for your garden. The same idea works for centerpieces. Your main flower is the star of the show. Then you fill in with something airy and light, often with tiny flowers. Lastly, you have a spiller. You can use greenery or flowers as the spiller, and this will give some definition to your arrangement.
Recently, I made a centerpiece with different types of roses that I was fortunate enough to have blooming in my garden at just the right time. I stayed in the same color scheme but used large roses in shades of pink from different types of climbers. Then I filled in with smaller roses and finished off with buds. To this, I added stems of blooming catmint (which smells amazing, by the way). One of my boxwood bushes has very soft and flowing foliage. Stems of the boxwood served as my spiller. I also added some budding flowers from my privet hedge for the “filler”. Using different types of plants and greenery can give your arrangement a polished look as long as you do not overdo it.
Don’t underestimate the value of greenery. “Shop” in your own garden with an eye for your arrangement, and you may see things in a different light. Ferns, boxwood clippings, or the unique leaves of false indigo can complete your centerpiece. Stems with seed heads (for example, allium) can also add one-of-a-kind interest. For winter arrangements, use pine to set the tone.
Add a personal touch to your centerpieces. For a baby shower, add teddy bears or building blocks. For book lovers, place your arrangement atop some used books. Tap into the interests of the guest of honor or the theme of the party to make it special for them.
Some of the supplies you may need are floral tape, Oasis, your container, sharp pruners, and a large flat box to transport your centerpieces. Take pictures at each stage of your arrangement from different angles. You may notice something out of place that you hadn’t seen before. It’s also a good idea to walk away for a time. Once you get into the thick of things, it’s easy to lose your objectivity. Ask an honest friend for their thoughts along the way. A word of advice: because arrangements often need to be made the night before the event, it’s probably not a good idea to take on this task if you have many other duties for the event. This last-minute timetable can make an otherwise happy event stressful.
In the end, don’t lose sight of the occasion. Life’s happy times with family and friends are the moments to savor. Don’t let the pressure of perfectly planning the details of an event steal your joy. We all need to focus on those loved ones who make the good times worth celebrating.
Tammy Thornton lives with her husband, children, and crazy pets while enjoying a life of gardening, cooking, and going to the beach.